

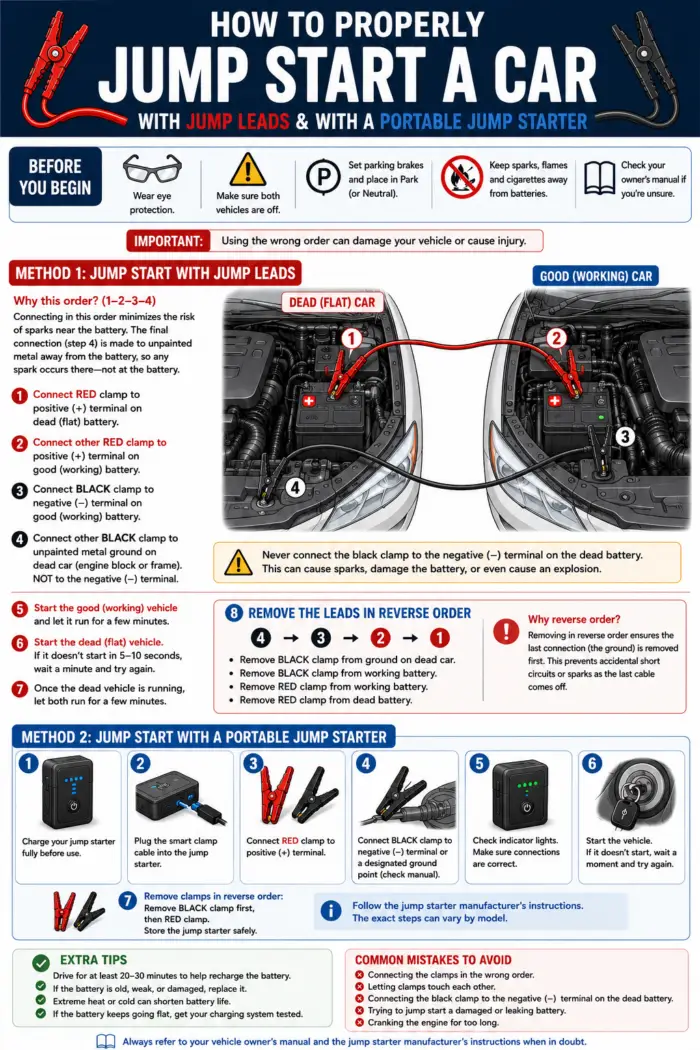
A dead battery can turn a simple trip into an unexpected delay. Fortunately, if the battery is only discharged, you can often get the car running again using either jump leads and another vehicle or a portable jump starter.
The key is doing it safely. Incorrect connections or the wrong sequence can damage electrical components or, in rare cases, cause sparks or a battery fire.
This guide walks you through both methods step by step.
Safety first: Always check your vehicle’s owner’s manual before jump‑starting. Some cars have specific jump‑start terminals or procedures. Never attempt to jump‑start a battery that is cracked, leaking, swollen, or visibly damaged.
Before You Begin
Make these basic checks before connecting anything:
- Park both vehicles safely and apply the parking brakes.
- Automatic transmission: Park (P). Manual: Neutral.
- Switch both vehicles off.
- Turn off lights, radios, heaters, and other electrical accessories.
- Keep flames, cigarettes, and sparks away from the batteries.
- Ensure the vehicles are not touching.
- Wear eye protection if available.
- Check the owner’s manual for any manufacturer‑specific instructions.
If you’re working with a hybrid or electric vehicle, do not assume the procedure is the same as a petrol or diesel car. Follow the manufacturer’s instructions.
Method 1: Jump‑Starting With Jump Leads
You will need:
- A vehicle with a charged battery.
- The vehicle with the flat battery.
- A suitable set of jump leads.
Most passenger cars use a 12‑volt system, but always confirm this in the manual.
Step 1: Position the Vehicles
Park the working vehicle close enough for the leads to reach, but do not let the vehicles touch.
Open both bonnets and locate the batteries or designated jump‑start terminals.
Code
       FLAT CAR                         WORKING CAR
     ┌───────────┐                    ┌───────────┐
     │    🔋     │                    │    🔋     │
     │    (+)    │                    │    (+)    │
     └───────────┘                    └───────────┘
          │                                  │
          │────────── RED (+) ──────────────│
          │                                  │
          └──── BLACK (ground) ──────────────┘
                    ↓
             Unpainted metal
             on flat car
Step 2: Connect the Red Lead to the Flat Battery
Attach the red positive (+) clamp to the positive terminal of the flat battery. Ensure it has a firm connection.
Step 3: Connect the Other Red Clamp
Attach the other red clamp to the positive (+) terminal of the working vehicle’s battery.
Step 4: Connect the Black Clamp to the Working Battery
Attach one black negative (–) clamp to the negative terminal of the working battery.
Step 5: Connect the Final Black Clamp to the Flat Car
Instead of connecting to the flat battery’s negative terminal, attach the final black clamp to a solid, unpainted metal grounding point on the engine block or chassis of the flat car.
This reduces the risk of sparks near the battery.
Code
 FLAT CAR                                      WORKING CAR

  (+) 🔋                                          🔋 (+)
   │                                                 │
   │────────────── RED JUMP LEAD ───────────────────│
                                                     │
  Ground point                                      (-)
   ●──────────────── BLACK JUMP LEAD ────────────────│
Never allow the clamps to touch each other.
Step 6: Start the Working Vehicle
Start the vehicle with the good battery and let it run for a few minutes. This gives the flat battery time to receive some charge.
Step 7: Start the Vehicle With the Flat Battery
Try starting the flat vehicle.
If it doesn’t start within a few seconds, wait briefly before trying again. Avoid cranking the engine repeatedly for long periods.
If it still won’t start, the issue may not be the battery.
Step 8: Remove the Jump Leads (Reverse Order)
Once the flat car is running, remove the leads carefully in reverse order:
- Black clamp from the flat car’s grounding point
- Black clamp from the working battery
- Red clamp from the working battery
- Red clamp from the flat battery
Keep clamps away from metal parts while they’re still connected.
Method 2: Jump‑Starting With a Portable Jump Starter
A portable jump starter is convenient because you don’t need another vehicle. These compact units can deliver enough power to start a car with a discharged battery.
Before using one, ensure it is fully charged and suitable for your vehicle.
Step 1: Switch Everything Off
Turn off the vehicle and engage the parking brake. Locate the battery or jump‑start terminals.
Step 2: Connect the Jump Starter
Follow the instructions provided with your specific jump starter. Many modern units require plugging the smart cable into the jump starter first.
Step 3: Connect the Positive Clamp
Attach the red clamp to the positive (+) terminal or designated positive jump point.
Step 4: Connect the Negative Clamp
Attach the black clamp to the negative (–) terminal or designated grounding point.
Some manufacturers recommend using a chassis or engine ground instead of the battery’s negative terminal.
Step 5: Check the Jump Starter
Most modern units have indicator lights showing whether the clamps are connected correctly.
If the unit shows a fault, stop and check the connections.
Step 6: Start the Vehicle
Attempt to start the engine. If it doesn’t start, wait briefly and try again according to the jump starter’s instructions.
Some units require staying connected for a short period after the engine starts.
Step 7: Disconnect the Jump Starter
Once the engine is running, disconnect the jump starter as instructed.
Code
       ENGINE RUNNING
             ↓
      ┌──────────────┐
      │  JUMP STARTER│
      └──────┬───────┘
             │
        🔴 (+)  ⚫ (-)
             │
             ▼
       Disconnect safely
       and store the unit
Which Method Is Better?
Jump Leads
Pros:
- Inexpensive
- Easy to store
- No charging required
Cons:
- Requires another vehicle
- Cars must be positioned close together
- Higher chance of incorrect connections
Portable Jump Starter
Pros:
- No second vehicle needed
- Compact and easy to store
- Ideal when stranded alone
Cons:
- Must be charged regularly
- Must be suitable for your vehicle
- Still requires correct connection sequence
For many drivers, a charged portable jump starter is the most convenient backup.
Hope this helps!